Attention: Here be dragons
This is the latest
(unstable) version of this documentation, which may document features
not available in or compatible with released stable versions of Godot.
Checking the stable version of the documentation...
Using the ArrayMesh
This tutorial will present the basics of using an ArrayMesh.
To do so, we will use the function add_surface_from_arrays(), which takes up to five parameters. The first two are required, while the last three are optional.
The first parameter is the PrimitiveType, an OpenGL concept that instructs the GPU
how to arrange the primitive based on the vertices given, i.e. whether they represent triangles,
lines, points, etc. See Mesh.PrimitiveType for the options available.
The second parameter, arrays, is the actual Array that stores the mesh information. The array is a normal Godot array that
is constructed with empty brackets []. It stores a Packed**Array (e.g. PackedVector3Array,
PackedInt32Array, etc.) for each type of information that will be used to build the surface.
Common elements of arrays are listed below, together with the position they must have within arrays.
See Mesh.ArrayType for a full list.
Index |
Mesh.ArrayType Enum |
Array type |
|---|---|---|
0 |
|
|
1 |
|
|
2 |
|
PackedFloat32Array or PackedFloat64Array of groups of 4 floats. The first 3 floats determine the tangent, and the last float the binormal direction as -1 or 1. |
3 |
|
|
4 |
|
|
5 |
|
|
10 |
|
PackedFloat32Array of groups of 4 floats or PackedInt32Array of groups of 4 ints. Each group lists indexes of 4 bones that affects a given vertex. |
11 |
|
PackedFloat32Array or PackedFloat64Array of groups of 4 floats. Each float lists the amount of weight the corresponding bone in |
12 |
|
In most cases when creating a mesh, we define it by its vertex positions. So usually, the array of vertices (at index 0) is required, while the index array (at index 12) is optional and will only be used if included. It is also possible to create a mesh with only the index array and no vertex array, but that's beyond the scope of this tutorial.
All the other arrays carry information about the vertices. They are optional and will only be used if included. Some of these arrays (e.g. ARRAY_COLOR)
use one entry per vertex to provide extra information about vertices. They must have the same size as the vertex array. Other arrays (e.g. ARRAY_TANGENT) use
four entries to describe a single vertex. These must be exactly four times larger than the vertex array.
For normal usage, the last three parameters in add_surface_from_arrays() are typically left empty.
Setting up the ArrayMesh
In the editor, create a MeshInstance3D and add an ArrayMesh to it in the Inspector. Normally, adding an ArrayMesh in the editor is not useful, but in this case it allows us to access the ArrayMesh from code without creating one.
Next, add a script to the MeshInstance3D.
Under _ready(), create a new Array.
var surface_array = []
Godot.Collections.Array surfaceArray = [];
This will be the array that we keep our surface information in - it will hold
all the arrays of data that the surface needs. Godot will expect it to be of
size Mesh.ARRAY_MAX, so resize it accordingly.
var surface_array = []
surface_array.resize(Mesh.ARRAY_MAX)
Godot.Collections.Array surfaceArray = [];
surfaceArray.Resize((int)Mesh.ArrayType.Max);
Next create the arrays for each data type you will use.
var verts = PackedVector3Array()
var uvs = PackedVector2Array()
var normals = PackedVector3Array()
var indices = PackedInt32Array()
List<Vector3> verts = [];
List<Vector2> uvs = [];
List<Vector3> normals = [];
List<int> indices = [];
Once you have filled your data arrays with your geometry you can create a mesh
by adding each array to surface_array and then committing to the mesh.
surface_array[Mesh.ARRAY_VERTEX] = verts
surface_array[Mesh.ARRAY_TEX_UV] = uvs
surface_array[Mesh.ARRAY_NORMAL] = normals
surface_array[Mesh.ARRAY_INDEX] = indices

# No blendshapes, lods, or compression used.
mesh.add_surface_from_arrays(Mesh.PRIMITIVE_TRIANGLES, surface_array)
surfaceArray[(int)Mesh.ArrayType.Vertex] = verts.ToArray();
surfaceArray[(int)Mesh.ArrayType.TexUV] = uvs.ToArray();
surfaceArray[(int)Mesh.ArrayType.Normal] = normals.ToArray();
surfaceArray[(int)Mesh.ArrayType.Index] = indices.ToArray();

var arrMesh = Mesh as ArrayMesh;
if (arrMesh != null)
{
    // No blendshapes, lods, or compression used.
    arrMesh.AddSurfaceFromArrays(Mesh.PrimitiveType.Triangles, surfaceArray);
}
备注
In this example, we used Mesh.PRIMITIVE_TRIANGLES, but you can use any primitive type
available from mesh.
Put together, the full code looks like:
extends MeshInstance3D

func _ready():
    var surface_array = []
    surface_array.resize(Mesh.ARRAY_MAX)

    # PackedVector**Arrays for mesh construction.
    var verts = PackedVector3Array()
    var uvs = PackedVector2Array()
    var normals = PackedVector3Array()
    var indices = PackedInt32Array()

    #######################################
    ## Insert code here to generate mesh ##
    #######################################

    # Assign arrays to surface array.
    surface_array[Mesh.ARRAY_VERTEX] = verts
    surface_array[Mesh.ARRAY_TEX_UV] = uvs
    surface_array[Mesh.ARRAY_NORMAL] = normals
    surface_array[Mesh.ARRAY_INDEX] = indices

    # Create mesh surface from mesh array.
    # No blendshapes, lods, or compression used.
    mesh.add_surface_from_arrays(Mesh.PRIMITIVE_TRIANGLES, surface_array)
public partial class MyMeshInstance3D : MeshInstance3D
{
    public override void _Ready()
    {
        Godot.Collections.Array surfaceArray = [];
        surfaceArray.Resize((int)Mesh.ArrayType.Max);

        // C# arrays cannot be resized or expanded, so use Lists to create geometry.
        List<Vector3> verts = [];
        List<Vector2> uvs = [];
        List<Vector3> normals = [];
        List<int> indices = [];

        /***********************************
        * Insert code here to generate mesh.
        * *********************************/

        // Convert Lists to arrays and assign to surface array
        surfaceArray[(int)Mesh.ArrayType.Vertex] = verts.ToArray();
        surfaceArray[(int)Mesh.ArrayType.TexUV] = uvs.ToArray();
        surfaceArray[(int)Mesh.ArrayType.Normal] = normals.ToArray();
        surfaceArray[(int)Mesh.ArrayType.Index] = indices.ToArray();

        var arrMesh = Mesh as ArrayMesh;
        if (arrMesh != null)
        {
            // Create mesh surface from mesh array
            // No blendshapes, lods, or compression used.
            arrMesh.AddSurfaceFromArrays(Mesh.PrimitiveType.Triangles, surfaceArray);
        }
    }
}
The code that goes in the middle can be whatever you want. Below we will present some example code for generating shapes, starting with a rectangle.
Generating a rectangle
Since we are using Mesh.PRIMITIVE_TRIANGLES to render, we will construct a rectangle
with triangles.
A rectangle is formed by two triangles sharing four vertices. For our example, we will create
a rectangle with its top left point at (0, 0, 0) with a width and length of one as shown below:
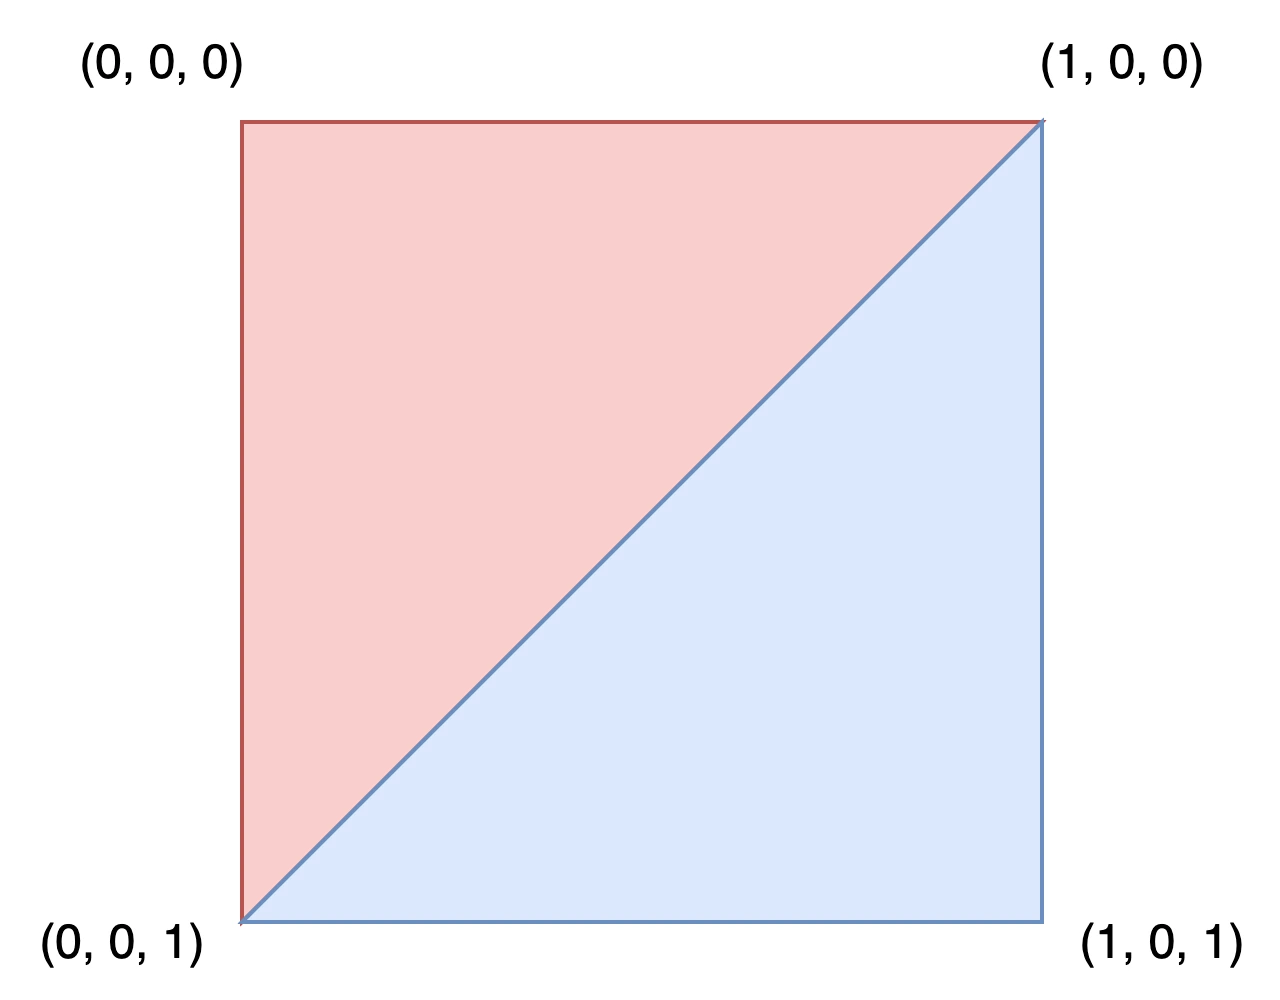
To draw this rectangle, define the coordinates of each vertex in the verts array.
verts = PackedVector3Array([
        Vector3(0, 0, 0),
        Vector3(0, 0, 1),
        Vector3(1, 0, 0),
        Vector3(1, 0, 1),
    ])
verts.AddRange(new Vector3[]
{
    new Vector3(0, 0, 0),
    new Vector3(0, 0, 1),
    new Vector3(1, 0, 0),
    new Vector3(1, 0, 1),
});
The uvs array helps describe where parts of a texture should go onto the mesh. The values
range from 0 to 1. Depending on your texture, you may want to change these values.
uvs = PackedVector2Array([
        Vector2(0, 0),
        Vector2(1, 0),
        Vector2(0, 1),
        Vector2(1, 1),
    ])
uvs.AddRange(new Vector2[]
{
    new Vector2(0, 0),
    new Vector2(1, 0),
    new Vector2(0, 1),
    new Vector2(1, 1),
});
The normals array is used to describe the direction the vertices face and is
used in lighting calculations. For this example, we will default to the Vector3.UP
direction.
normals = PackedVector3Array([
        Vector3.UP,
        Vector3.UP,
        Vector3.UP,
        Vector3.UP,
    ])
normals.AddRange(new Vector3[]
{
    Vector3.Up,
    Vector3.Up,
    Vector3.Up,
    Vector3.Up,
});
The indices array defines the order vertices are drawn. Godot
renders in a clockwise direction, meaning that we must specify the vertices
of a triangle we want to draw in clockwise order.
For example, to draw the first triangle, we will want to draw the vertices (0, 0, 0),
(1, 0, 0), and (0, 0, 1) in that order. This is the same as drawing vert[0], vert[2], and
vert[1], i.e., indices 0, 2, and 1, in the verts array. These index values are what the
indices array defines.
Index |
|
|
|
|---|---|---|---|
0 |
(0, 0, 0) |
(0, 0) |
Vector3.UP |
1 |
(0, 0, 1) |
(1, 0) |
Vector3.UP |
2 |
(1, 0, 0) |
(0, 1) |
Vector3.UP |
3 |
(1, 0, 1) |
(1, 1) |
Vector3.UP |
indices = PackedInt32Array([
        0, 2, 1, # Draw the first triangle.
        2, 3, 1, # Draw the second triangle.
    ])
indices.AddRange(new int[]
{
    0, 2, 1, // Draw the first triangle.
    2, 3, 1, // Draw the second triangle.
});
Put together, the rectangle generation code looks like:
extends MeshInstance3D

func _ready():

  # Insert setting up the PackedVector**Arrays here.

  verts = PackedVector3Array([
          Vector3(0, 0, 0),
          Vector3(0, 0, 1),
          Vector3(1, 0, 0),
          Vector3(1, 0, 1),
      ])

  uvs = PackedVector2Array([
          Vector2(0, 0),
          Vector2(1, 0),
          Vector2(0, 1),
          Vector2(1, 1),
      ])

  normals = PackedVector3Array([
          Vector3.UP,
          Vector3.UP,
          Vector3.UP,
          Vector3.UP,
      ])

  indices = PackedInt32Array([
          0, 2, 1,
          2, 3, 1,
      ])

  # Insert committing to the ArrayMesh here.
using System.Collections.Generic;

public partial class MeshInstance3d : MeshInstance3D
{
  public override void _Ready()
  {
      // Insert setting up the surface array and lists here.

      verts.AddRange(new Vector3[]
      {
          new Vector3(0, 0, 0),
          new Vector3(0, 0, 1),
          new Vector3(1, 0, 0),
          new Vector3(1, 0, 1),
      });

      uvs.AddRange(new Vector2[]
      {
          new Vector2(0, 0),
          new Vector2(1, 0),
          new Vector2(0, 1),
          new Vector2(1, 1),
      });

      normals.AddRange(new Vector3[]
      {
          Vector3.Up,
          Vector3.Up,
          Vector3.Up,
          Vector3.Up,
      });

      indices.AddRange(new int[]
      {
          0, 2, 1,
          2, 3, 1,
      });

      // Insert committing to the ArrayMesh here.
  }
}
For a more complex example, see the sphere generation section below.
Generating a sphere
Here is sample code for generating a sphere. Although the code is presented in GDScript, there is nothing Godot specific about the approach to generating it. This implementation has nothing in particular to do with ArrayMeshes and is just a generic approach to generating a sphere. If you are having trouble understanding it or want to learn more about procedural geometry in general, you can use any tutorial that you find online.
extends MeshInstance3D

var rings = 50
var radial_segments = 50
var radius = 1

func _ready():

    # Insert setting up the PackedVector**Arrays here.

    # Vertex indices.
    var thisrow = 0
    var prevrow = 0
    var point = 0

    # Loop over rings.
    for i in range(rings + 1):
        var v = float(i) / rings
        var w = sin(PI * v)
        var y = cos(PI * v)

        # Loop over segments in ring.
        for j in range(radial_segments + 1):
            var u = float(j) / radial_segments
            var x = sin(u * PI * 2.0)
            var z = cos(u * PI * 2.0)
            var vert = Vector3(x * radius * w, y * radius, z * radius * w)
            verts.append(vert)
            normals.append(vert.normalized())
            uvs.append(Vector2(u, v))
            point += 1

            # Create triangles in ring using indices.
            if i > 0 and j > 0:
                indices.append(prevrow + j - 1)
                indices.append(prevrow + j)
                indices.append(thisrow + j - 1)

                indices.append(prevrow + j)
                indices.append(thisrow + j)
                indices.append(thisrow + j - 1)

        prevrow = thisrow
        thisrow = point

  # Insert committing to the ArrayMesh here.
public partial class MyMeshInstance3D : MeshInstance3D
{
    private int _rings = 50;
    private int _radialSegments = 50;
    private float _radius = 1;

    public override void _Ready()
    {
        // Insert setting up the surface array and lists here.

        // Vertex indices.
        var thisRow = 0;
        var prevRow = 0;
        var point = 0;

        // Loop over rings.
        for (var i = 0; i < _rings + 1; i++)
        {
            var v = ((float)i) / _rings;
            var w = Mathf.Sin(Mathf.Pi * v);
            var y = Mathf.Cos(Mathf.Pi * v);

            // Loop over segments in ring.
            for (var j = 0; j < _radialSegments + 1; j++)
            {
                var u = ((float)j) / _radialSegments;
                var x = Mathf.Sin(u * Mathf.Pi * 2);
                var z = Mathf.Cos(u * Mathf.Pi * 2);
                var vert = new Vector3(x * _radius * w, y * _radius, z * _radius * w);
                verts.Add(vert);
                normals.Add(vert.Normalized());
                uvs.Add(new Vector2(u, v));
                point += 1;

                // Create triangles in ring using indices.
                if (i > 0 && j > 0)
                {
                    indices.Add(prevRow + j - 1);
                    indices.Add(prevRow + j);
                    indices.Add(thisRow + j - 1);

                    indices.Add(prevRow + j);
                    indices.Add(thisRow + j);
                    indices.Add(thisRow + j - 1);
                }
            }

            prevRow = thisRow;
            thisRow = point;
        }

        // Insert committing to the ArrayMesh here.
    }
}
Saving
Finally, we can use the ResourceSaver class to save the ArrayMesh. This is useful when you want to generate a mesh and then use it later without having to re-generate it.
# Saves mesh to a .tres file with compression enabled.
ResourceSaver.save(mesh, "res://sphere.tres", ResourceSaver.FLAG_COMPRESS)
// Saves mesh to a .tres file with compression enabled.
ResourceSaver.Save(Mesh, "res://sphere.tres", ResourceSaver.SaverFlags.Compress);